The concrete slump test is a highly common quality control test, that determines the workability and consistency of fresh concrete. It’s very effective for evaluating the ease with which the concrete could be placed, consolidated, and finished. In the following, read a precise description of carrying out the slump test correctly, at every step, and answers to the common questions that may arise.
What is the Concrete Slump Test?
The Slump Test measures the workability of fresh concrete in terms of consistency by observing the magnitude to which a conical sample of the concrete slumps or subsides after removing the cone. It is then expressed in inches or millimeters, this slump value carries precious information regarding the workability of concrete.
Why Is the Slump Test Important?
- Workability Assessment: It indicates how easily the concrete can be placed and finished without segregation.
- Check on Consistency: It ensures uniformity among different batches of concrete.
- Quality Control: Helps maintain the desired strength and durability of the hardened concrete.
- Compliance Verification: Ensures the concrete mix meets project specifications.
Step-by-Step Slump Test Procedure:
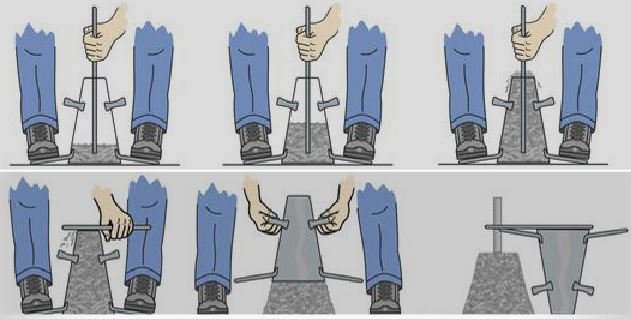
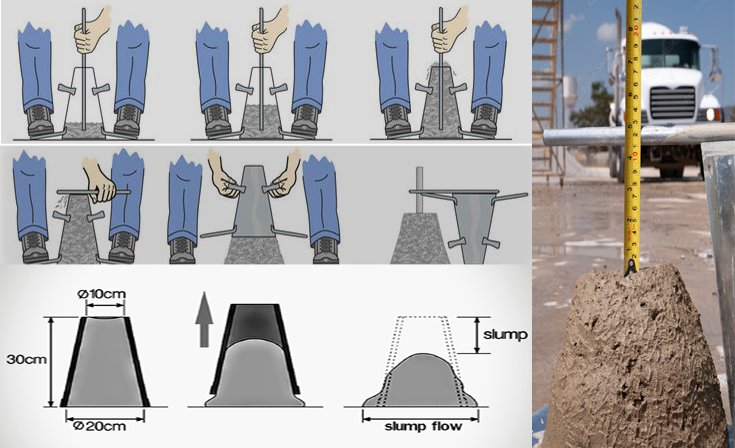
1. Gather Equipment: You’ll need a slump cone (typically 30 cm high with a 20 cm base and a 10 cm top), a tamping rod (16 mm diameter and 0.6 m long), a measuring tape or ruler, a level surface (usually a metal plate), and a shovel or scoop.
2. Dampen the Cone: Splash a little water over the insides of the cone to avoid sticking with concrete.
3. Fill the Cone: Place the slump cone on the level surface and firmly hold it down. Fill the cone in three equal layers.
4. Rod Each Layer: Compact each layer with 25 strokes of the tamping rod, distributing the strokes evenly across the cross-section. Be sure to penetrate the underlying layer with the rod.
5. Strike Off Excess Concrete: Once the cone is full, use a straight edge to strike off the excess concrete.
6. Lift the Cone: Carefully and vertically lift the cone off the concrete, ensuring a smooth and steady upward motion.
7. Take Slump Measurement: Invert the slump cone next to the concrete that has slumped down. Take the vertical measurement from the top of the slump cone up to the highest point on the slumped concrete. This reading is called the slump value.
8. Record the Result: Document the slump value, time, date, and any unusual observations about the slump shape (e.g., shear slump, true slump, collapsed slump).
Interpreting Slump Test Results:
• Zero Slump (less than 25 mm): Dry concrete, typically used for road bases.
• Low Slump (25-50 mm): Stiff concrete, suitable for heavily reinforced structures.
• Medium Slump (50-100 mm): Most common range for general construction applications.
• High Slump (100-175 mm): Flowing concrete, used for placements with limited access or complex formwork.
• Collapse Slump (175+ mm or complete loss of form): Indicates excessive water content and poor mix design.
FAQ:
Q: How often should the concrete slump test be performed?
At least once per concrete delivery and whenever there is a change in materials or mix proportions.
Q: What factors affect the slump value?
Water content, cement content, aggregate properties, admixtures, and temperature.
Q: What is a shear slump?
A shear slump occurs when one-half of the cone slides down an inclined plane. This indicates poor cohesion and potential segregation.
Q: What is a collapsed slump?
A collapsed slump happens when the concrete completely loses its shape, indicating excessive water and very low workability. It requires immediate corrective action.
Q: Can the slump test be used for all types of concrete?
While widely used, the slump test is most suitable for concrete with aggregate sizes up to 38 mm. Other tests are more appropriate for highly flowable or self-compacting concrete.
Read More: Protecting Construction Materials from Moisture and Water Damage
Conclusion:
The concrete slump test is so simple, cheap, and, above all, a powerful means of quality control for ready concrete. Learn more about how to make this test work for you successfully in placing and having the project perform with your concrete by simply following the procedure and realizing what influences slump. Always refer to the appropriate standards and specifications for specific requirements for a given project.















1 comment
[…] Other than the strength test, other tests conducted are slump test, air content, setting time, and permeability […]